This year I had the pleasure of doing a Google I/O talk with John Ryan. Under the title “Building a package in Dart”, the aim was to showcase some of aspects involved when publishing packages on pub.dev. If you’re interested you can watch the video on youtube, or embedded below:
The talk was pre-recorded, as I wasn’t near a studio I recorded my part of the talk in my garage. And when it is clean my garage is just white walls, which doesn’t make for the coolest backdrop. So I stacked a bunch of cheap cardboard boxes for use as a background.
I obviously, did this so that I could introduce by myself by saying: “Hi, I’m Jonas, I work on package delivery, not this kind of packages”, while pointing on the boxes stacked up behind me. I will confess that this is an extraordinarily lame joke! In any case, I hope you enjoyed watching the joke as much as I enjoyed making it.
I haven’t really made this kind of video before. A it was a lot of fun, and hard work. At the end of the recording I had surprisingly little voice left, how people do longer recordings I don’t know. But this experience certainly gave me a lot of respect for youtubers doing hours of scripted video.
Disclaimer: The opinions stated here are my own, not necessarily those of my employer.
When resolving dependencies for a Dart or Flutter application it is only possible to have one version of a given package. This ensures that the dependency graph is fairly lean, since each package can only be in the graph ones. So unlike npm, you won’t end up with 3 different versions of some utility package.
On the flip side, you can run into dependency conflicts. If two packages have dependency on foo, then they cannot be used together unless there a version of foo that satisfies both constraints. As most package authors are using caret-constraints (foo: ^1.2.0) this mostly becomes a problem a new major version of foo is published. For example, pkg_a might require foo: ^1.0.0, while pkg_b requires foo: ^2.0.0, effectively preventing packages pkg_a and pkg_b from being used in the same application.
There are some workarounds for these scenarios:
Author of pkg_a can publish a new version that is compatible with foo: ^2.0.0.
If version 1.0.0 and 2.0.0 of foo are similar, it may be possible for the author of pkg_b to publish a version compatible with both using a constraint like foo: >=1.0.0 <3.0.0.
If an older version of pkg_b is compatible with foo: ^1.0.0, the user may choose to use an older version of pkg_b. Indeed the solver will pick an older verison of pkg_b, if allowed by dependency constraints.
If version 1.0.0 and 2.0.0 of foo are sufficiently similar, it may be possible for the user to employ dependency_overrides to circumvent the dependency-conflict.
However, these workarounds are not always possible. The author of pkg_a might have abandoned the package. Changes between 1.0.0 and 2.0.0 of foo might be so breaking that using a version range or dependency_overrides is infeasible. It may be that there is some functionality in foo version 1.0.0 that is not in 2.0.0 and it is critical for pkg_a to work.
At some point, you may reach the conclusion that it would better to have multiple versions of foo than finding a clean way to fix the underlying issue. In such scenarios, package:vendor can help you vendor dependencies.
Vendoring Dependencies
To vendor dependencies with package:vendor you will need a vendor.yaml file next to your pubspec.yaml. The vendor.yaml file allows you to specify:
Which package and version to vendor.
Under what folder name a package version should be vendored.
What import-rewrites to apply to your application code.
What import-rewrites to apply to the vendored packages.
Which files to vendor for a given package.
The vendor.yaml file looks as follows:
# vendor.yaml
import_rewrites:# Map of rewrites that should be applied to lib/, bin/ and test/# Example:# import "package:<package>/..."# is rewritten to:# import "package:myapp/src/third_party/<name>/lib/..."# where 'myapp' is the root project name.<package>: <name>vendored_dependencies:# Specification of which packages to be vendor into:# lib/src/third_party/<name>/<name>:
package:<package>version:<version>import_rewrites:# Rewrites to be applied inside: lib/src/third_party/<name>/<package>: <name>include:# Glob patterns for which files to include from the package.# For syntax documentation see: https://pub.dev/packages/glob## If not specified `include` will default to the following list:- pubspec.yaml # always renamed vendored-pubspec.yaml- README.md
- LICENSE
- CHANGELOG.md
- lib/**- analysis_options.yaml
In effect, the vendor.yaml specifies the desired state after vendoring packages. When creating a vendor.yaml file it is your responsibility that the dependencies of the package you’re vendoring are satisfied. You can do this by adding them as a dependency in your pubspec.yaml, or by vendoring the dependency and applying an import_rewrite to the original vendored package.
When you’ve written a vendor.yaml you can do dart run vendor to vendor dependencies. Vendored dependencies are written to lib/src/third_party/<name>/, and their public libraries must usually be imported from lib/src/third_party/<name>/lib/<library>.dart.
Once you have vendored dependencies it is advicable that you commit your vendor.yaml and the contents of lib/src/third_party/. The dart pub vendor command will store the current state of vendored dependencies in lib/src/third_party/vendor-state.yaml. This allows dart pub vendor to detect the changes in your vendor.yaml file. Thus, when you run dart pub vendor it will not delete vendored packages that have no changed. This is important as it allows you to patch the packages you have vendored.
Hence, you can also use package:vendor, if you need to make a quick modification of a dependency. But if you patch your vendored dependencies, you should take care to run dart pub vendor --dry run next time your vendoring. This helps you check if you’re deleting the changes you’ve made.
All in all, I think package:vendor turned out as a nice solution. It’s not a fix for everything. And if the dependency you’re vendoring integrates with a lot of other packages it can quickly get messy, and you might have to vendor a lot of dependencies to get things working. Vendoring is not a solution to every problem, but it is another tool for resolving dependency conflicts, or easily patching that one dependency that doesn’t get updated anymore.
In general, we should all hope we’ll never have to vendor dependencies.
Back in high school (HTX 2005-2008) I operated a custom MediaWiki application for collaborative note taking, tracking home work and occasional sharing of homework 🙈. In case you don’t know MediaWiki is the software behind wikipedia.org. At the time I was using a Danish hosting provider, and couldn’t get LaTeX integration working properly, so I ended up hacking MediaWiki to use mimetex. Similarly, I added a few extensions for calendar integration, raw HTML, etc. These hacks and extensions made upgrading MediaWiki challenging, hence, I never upgraded past MediaWiki 1.5.5 released in 2006.
It should not surprise anyone that the wiki was full of spam a few years later. Even though, write access was only granted to trusted users. Some bot must have been scanning the internet for MediaWiki installations with known vulnerabilities, and automatically exploited those vulnerabilities to post spam. Naturally, I ended up taking the wiki offline, being too busy to fix it.
Then earlier this year I decided that it was the time to revive my old wiki. But how do you revive an ancient php4 / mysql4 application? It’s probably possible to tweak it such that it works on newer versions of PHP and MySQL. But my database dumps from mysql4 didn’t import on mysql5 without hacks, and some of my extensions didn’t work with php5. So I decided to go looking for a way to install and run php4 and mysql4.
Initially, I went looking for a docker image or virtual machine with a php4 and mysql4 LAMP stack pre-configured. But I had no such luck, there was a few php4 docker images, but they were running mysql5. Then I found the End-Of-Life Debian images on hub.docker.com/r/debian/eol/. Using debian/eol:sarge it is easy to install php4 and mysql4 from the package manager, as illustrated in the Dockerfile below.
FROM debian/eol:sarge
ENV DEBIAN_FRONTEND noninteractive
# Install php4, mysql4, apache2, imagemagick, build-essential and phpmyadmin (for good measure)RUN apt-get update -y \
&& apt-get install -y \
mysql-server \
mysql-client \
php4 \
apache2 \
libapache2-mod-php4 \
php4-mysql \
imagemagick \
build-essential \
phpmyadmin
# Enable mod_rewriteRUN a2enmod rewrite \
&& sed -i 's/AllowOverride None/AllowOverride all/' /etc/apache2/sites-available/default
# Launch apache2 and mysql when starting the containerENTRYPOINT /bin/bash -c 'apache2 > /dev/null && mysqld > /dev/null & exec bash --login'
The Dockerfile above will create an image with a php4/mysql4 LAMP stack serving from /var/www/. For simple LAMP applications all that remains is to configure mysql users, restore database from SQL dump, and copy php files and resources into /var/www/. This can be done with a few commands as illustrated below.
# Setup mysql with empty root password
mysqladmin -u root password ''# Create $DATABASE_USERNAME with $DATABASE_PASSWORD
echo "GRANT ALL PRIVILEGES ON *.* TO '$DATABASE_USERNAME'@'localhost' IDENTIFIED BY '$DATABASE_PASSWORD';" | mysql;
# Create $DATABASE_NAME and load contents from SQL dump.
echo "CREATE DATABASE $DATABASE_NAME; USE $DATABASE_NAME;" | cat - /src/database-dump.sql | mysql
# Copy php files and resources to /var/www
cp -r /src /var/www
From php4 your application can connect to localhost:socket with the $DATABASE_USERNAME and $DATABASE_PASSWORD created above. Obviously, one should never expose this Docker image to the internet (ie. deploy it to a server). Debian Sarge haven’t received security updates for years. But we can crawl the site and convert it to static files using wget. Simply run the LAMP app as a Docker container locally, find the IP of the Docker container, and run wget as follows:
If your old LAMP application contains absolute links, one can temporarily tweak /etc/hosts to make the domain point to docker container. Also checkout the wget manual for more options, depending on our URL patterns --restrict-file-names=nocontrol might look better. To successfully render my old MediaWiki setup into static files I tweaked the theme to remove unnecessary links. But wget also has options to exclude certain directories for patterns. In my case the final result is visible at jopsen.dk/wiki, these are my high school notes (in Danish).
I had actually dreaded this project a bit, fearing that I would have to follow a lengthy install guide to setup a server on a slow virtual machine. But thanks to the amazing Debian EOL images for docker reviving and old php4 / mysql4 LAMP app was almost a breeze — who knew restarting apache could make you feel all nostalgic 😀
When writing servers I often find myself having an acyclic graph of minor setup tasks. These tasks often include steps such as:
Setup credentials from instance metadata,
Load and validate configuration,
Connect to database and/or shared cache (redis, memcache),
Subscribe to a message broker (pub/sub, RabbitMQ, etc),
Start background tasks,
Load templates from disk,
Setup request routers and handlers,
Listen for incoming HTTP requests,
Depending on the service many of these steps have to be done before the server starts accepting traffic. As many of the steps depend upon the output of previous steps, this often becomes a large sequential method that does one step at time.
It usually happens that some steps are completely unrelated and could easily run concurrently. For example, there is no reason my server application can’t load templates from disk while also initiating a connection to database.
However, a method that concurrently executes unrelated steps, while ensuring that steps with inter-dependencies are executed sequentially, can quickly become complex and hard to maintain. To solve this problem I’ve published package:acyclic_steps. I’m sure there are other ways of solving this problem, feel free to show how you do this in the comment section.
At the high-level package:acyclic_steps facilities the definition of steps. Where a step may produce a value, and may have dependencies upon other steps.
/// A Step that loads configuration.// NOTE: Typing Step<Config> is necessary for inference final Step<Config> configStep = Step
.define('load-config')
.build(() async {
// Load configuration somehowreturn Config.fromJson(json.decode(
await File('config.json').readAsString(),
));
});
/// A step that connects to a database.final Step<DBConnection> databaseStep = Step
.define('connect-database')
.dep(configStep) // Add dependency upon the configStep
.build((
// Result from the configStep is injected as cfg.// Typing not needed, as Config will be inferred from configStep.
cfg,
) async {
return await DBConnection.connect(cfg.database);
});
On its own a step isn’t a very interesting object. You can get its name and direct dependencies, which is useful for printing the graph (and debugging). But one cannot simply execute a step.
Instead a step is executed using a Runner. The Runner takes care of executing dependent steps first, with maximum concurrency. The Runner object also caches the result of a step, such that a step is only executed once (by a given Runner), even if multiple other steps depend upon it.
Future<void> main() async {
// Create Runner objectfinal runner = Runner();
// Run the databaseStep, which will run the configStep first.final dbconn = await runner.run(databaseStep);
// NOTE: The type of the result is inferred from databaseStep.assert(dbconn is DBConnection);
}
Having to define a graph of steps from scratch whenever the initial input changes is not very convenient. To facilitate injection of some initial input for a graph of steps, the Runner object allows for steps to be overridden.
When a step is overridden a value is injected into the Runner objects internal cache. Such that any step that depends on the overridden step gets the injected value. This mechanism can be used to inject an initial value into a graph of steps, by defining virtual steps that must be overwritten with a value.
/// A virtual step for injecting initial configuration.final Step<Config> configStep = Step
.define('config')
.build(() async {
throw UnsupportedError('configStep must be overridden');
});
Future<void> main() async {
// Create Runner objectfinal runner = Runner();
runner.override(configStep, Config(/* ... */));
// Run the databaseStep, which will use the result of the overridden configStepfinal dbconn = await runner.run(databaseStep);
}
The ability to override a step can also be used for dependency injection. When writing tests it might be desirable to override the step that provides a shared cache (like redis or memcached) with a fake in-memory implementation suitable for local testing.
Beyond overriding steps the Runner object also allows the execution of steps to be wrapped. This can be useful for measuring and reporting the execution time of steps, handling or wrapping certain exceptions, or as illustrated below retry steps that fail due to I/O exceptions.
import'package:retry/retry.dart';
Future<void> main() async {
Future<T> wrapStepWithRetry<T>(
Step<T> step,
Future<T> Function() runStep,
) async {
return await retry(() async=> await runStep());
}
// Create Runner objectfinal runner = Runner(wrapRunStep: wrapStepWithRetry);
// Run the databaseStep, with a runner that will retry step execution.final dbconn = await runner.run(databaseStep);
}
Standing at the end of 2018 and having written no blog posts all year, I figure now would be a good time to give a brief personal note on what changed in my life in 2018.
Having realized that I didn’t want to make my life in America permanent, I relocated from San Francisco to Aarhus (Denmark) in April. I had a lot of great experiences in the Bay Area, both personally and professionsally. But I also missed friends and family, so moving back wasn’t a hard decision. In some ways it’s surprising it took this long. I like to joke that Trump made me want to move back to Denmark, but truth is that a run in with one of the many homeless people in San Francisco is enough to make me long for the welfare state I grew up in.
Leaving Mozilla, however, was not an easy decision — I wish to stress that I left Mozilla after relocating (not because of my decision to relocate). After 5 years at Mozilla I needed new challenges. I spent almost all my time at Mozilla building TaskCluster, the task-graph execution framework powering continuous integration and release processes at Mozilla. Having been part of this project from the very start and allowed to take major design decisions, it was hard to leave this project behind. Yet, I have absolute confidence that my co-workers will be able to take this project into the future.
In August I joined the Dart team at Google in Aarhus, to work on Dart related matters. Not being able to talk about everything I do is new to me, but as things become public I might try to write a technical note from time to time. Most of my work will still be open source, and if you stalk me on GitHub you’ll already have seen me involved in the package hosting service dart. So far working at Google have been a joy — the food is pretty good!
This was also the year where I finally got an apartment with more than one room! And I bought real non-IKEA furniture like a grown-up would do, hehe. I also bought my first car (Blue, Toyota Yaris H2), and slowly getting good at not driving into bus-only lanes! Between my employment at Mozilla and Google, I spent a week of my summer attending YMCA-YWCA children summer camp again — lots of fun, pirate boat sailing and water fights. Overall I’m greatly enjoying the changes I’ve made, and looking forward to 2019.
Many systems are configured using JSON (or YAML), and there is often a need to parameterize such configuration. Examples include: AWS CloudFormation, Terraform, Google Cloud Deployment Manager, Taskcluster Tasks/Hooks, the list goes on.
This paramterization is usually accomplished with one of the following approaches:
Use of custom variable injection syntax and special rules,
Rendering with a string templating engine like jinja2 or mustache prior to parsing the JSON or YAML configuration, or,
Use of a general purpose programming language to generate the configuration.
Approach (1) is for example used by AWS CloudFormation and Terraform. In Terraform variables can be injected with string interpolation syntax, e.g. ${var.my_variable}, and resource objects with a count = N property are cloned N times. Drawbacks of this is that each system have its own logic and rules that you’ll have to learn. Often these are obscure, verbose and/or inconsistent, as template language design isn’t the main focus of a project like Terraform or CloudFormation.
Approach (2) is among other places used in Google Cloud Deployment Manager, it was also employed in earlier versions of .taskcluster.yml. For example in Google Cloud Deployment Manager your infrastructure configuration file is rendered using jinja2 before being parsed as YAML. Which allows you to make a parameterized infrastructure configuration. While this approach reuse existing template logic, drawbacks include the fact that after passing through the text template engine your JSON or YAML may no longer parse due to whitespace issues, commas or other terminals accidentally injected. If the template is big, this is easy to do, resulting in errors that are hard to understand and track down.
Approach (3) is for example used by vagrant where config files are written in Ruby. It’s also used in gecko where moz.build files written in Python define which source files to compile. This approach is powerful, and reuse existing established languages. Drawbacks of this approach is that you need sandboxing to read untrusted config files. This approach also binds you to a specific programming language, or at-least forces you to have an interpreter for said language installed. Finally, there can be cases where these, often imperative configuration files becomes clutter and littered with if-statements.
Introducing json-e
json-e is a language for parameterization of JSON following approach (1), which is to say you can write your json-e template as JSON, YAML or anything that translates to a JSON object structure in-memory. Then the JSON structure can be rendered with json-e, meaning interpolation of variables and evaluation of special constructs.
An example is probably the best way to understand json-e, below is a javascript example of how json-e works.
Most of the variable interpolation here is obvious, but constructs like {$if: E, then: A, else: B} are very powerful. Here E is an expression while A and B are templates. Depending on the expression the whole construct is replaced with either A or B, if either one of those are omitted the parent property or array index is deleted.
As evident from the example above json-e contains an entire expression language. This allows for complex conditional constructs and powerful variable injection. Aside from the expression language json-e defines a set of constructs. These are objects containing a special keyword property that always starts with $. The conditional $if is one such construct. These constructs allows for evaluation of expressions, flattening of lists, merging of objects, mapping elements in a list and many other things.
The constructs are first interpreted after JSON parsing. Hence, you can write json-e as YAML and store it as JSON. In fact, I would recommend writing json-e using YAML as this is very elegant. For a full reference of all the constructs, built-in functions, and expression language features checkout the json-e documentation site, it even includes an interactive json-e demo tool.
Design Choices
Unlike the special constructs and syntax used in AWS CloudFormation and Terraform, json-e aim to be a general purpose JSON parameterization engine. So ideally, json-e can be reused in other projects. The design is largely guided by the following desires:
Familiarity to Python and Javascript developers,
Injection of variables after parsing JSON/YAML,
Safe rendering without need for OS-level sandboxing,
Extensibility by injection of functions as well as variables,
Avoid Turing completeness to prevent templates from looping forever,
Side-effect free results (baring side-effects in injected functions),
Implementation in multiple languages.
We wanted safe rendering because it allows for services like taskcluster-github to render untrusted templates from .taskcluster.yml files. Similarly, we wanted implementations in multiple languages to avoid being tied to specific programming language, but also to facilitate web-based tools for debugging json-e templates.
State of json-e Today
As of writing the json-e repository contains and implementation of json-e in Javascript, Python and golang, along with a large set of test cases to ensure compatibility between the implementations. Writing a json-e implementation is fairly straight forward, so new implementations are likely to show up in the future.
For those interested in the details I recommend reading about Pratt-parsers, which have made implementation of the same interpreter in 3 languages fairly easy.
Today, json-e is already used in-tree (in gecko), we use it as part of the interface for expressing actions and be triggered in the automation UI. For those interested there is the in-tree documentation and the actions.json specification. We also have plans to use json-e for a few other things including github integration and taskcluster-hooks.
As for stability we may add new construct and functions json-e in the future, but major changes are not planned. For obvious reasons we don’t want to break backwards compatibility, this have happened a few times initially, mostly to correct things that were unintended design flaws. We still have a few open issues like unicode handling during string slicing. But by now we consider json-e stable.
On a final note I would like to extend a huge thanks to the many contributors who have worked on json-e, as of writing the github repository already have commits from 12 authors.
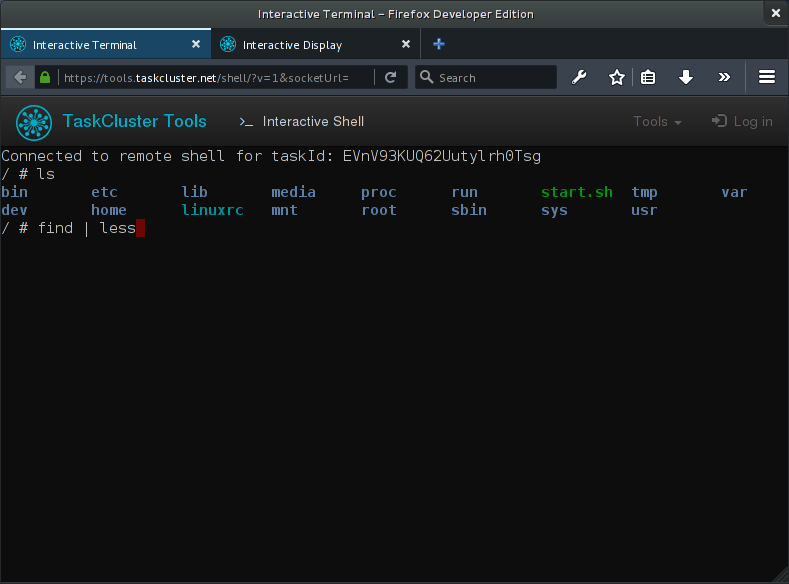
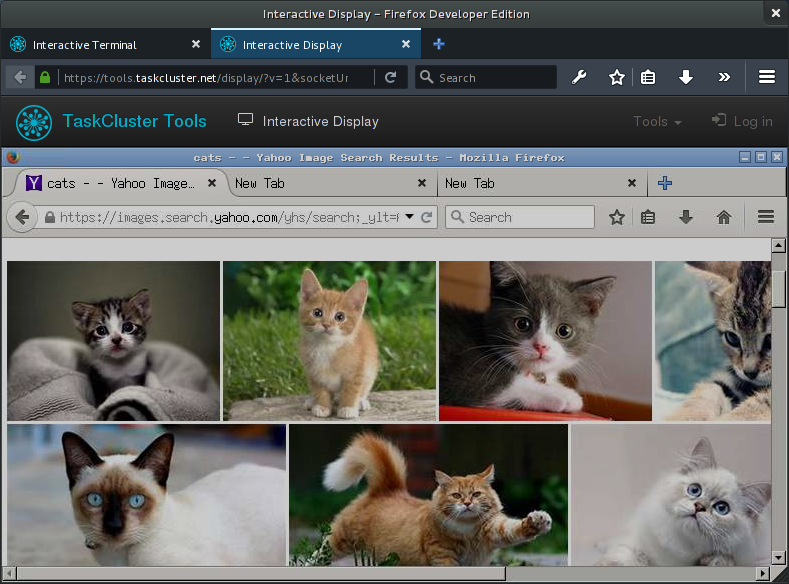
Last summer Edgar Chen (air.mozilla.org) built on an interactive shell for TaskCluster Linux workers, so developers can get a SSH-like session into a task container from their browser. We’ve slowly been improving this, and prior to Mozlando I added support for opening a VNC-like session connecting to an X-session inside a task container. I’ll admit I was mostly motivated by the prospect of giving an impressive demo, and the implementation details are likely to change as we improve it further. Consequently, we haven’t got many guides on how to use these features in their current state.
However, with people asking for TaskCluster “loaners” on IRC, I figure now is a good time to explain how these interactive features can be used to provide a loaner-on-demand flow for TaskCluster workers. At least on Linux, but hopefully we can do a similar thing on other platforms too. Before we dive in, I want to note that all of our Linux tasks runs under docker with one container per tasks. Hence, you can pull down the docker image and play with it locally, the process and caveats such as setting up loopback video and audio devices is beyond the scope of this post. But feel free to ask on IRC (#taskcluster), I’m sure Greg Arndt has all the details, some of them are already present in “Run Locally” script displayed in the task-inspector.
Quick Start
If you can’t wait to play, here are the bullet points:
You’ll need a commit-level 1 access (and LDAP login)
Under “Job details” click the “Inspect Task” (this will open the task-inspector)
In the top right corner in the task-inspector click “Login” (this opens login.taskcluster.net on a new tab)
“Sign-in with LDAP” or “Sign-in with Okta” (Okta only works for employees)
Click the “Grant Access” button (to grant tools.taskcluster.net access)
In the task-inspector under the “Task” tab, scroll down and click the “One-Click Loaner” button
Click again to confirm and create a one-click loaner task (this takes you to a “Waiting for Loaner” page)
Just wait… 30s to 5 min (you can open the task-inspector for your loaner task to see the live log, if you are impatient)
Eventually you should see two big buttons to open an interactive shell or display
You should now have an interactive terminal (and display) into a running task container.
Warning: These loaners runs on EC2 spot-nodes, they may disappear at any time. Use them for quickly trying something, not for writing patches.
Given all these steps, in particular the “Click again” in step (6), I recognize that it might take more than one click to get a “One-Click Loaner”. But we are just getting started, and all of this should be considered a moving target. The instructions above can also be found on MDN, where we will try to keep them up to date.
Implementation Details
To support interactive shell sessions the worker has an end-point that accepts websocket connections. For each new websocket the worker spawns a sh or bash inside the task container and pipes stdin, stdout and stderr over the websocket. In browser we use then have the websocket reading from and writing to hterm (from the chromium project) giving us a nice terminal emulator in the browser. There is still a few issues with the TTY emulation in docker, but it works reasonably for small things.
For interactive display sessions (VNC-like sessions in the browser) the worker has an end-point which accepts both websocket connections and ordinary GET requests for listing displays. For each GET request the worker will run a small statically linked binary that lists all the X-sessions inside the task container, the result is then transformed to JSON and returned in the request. Once the user has picked a display, a websocket connection is opened with the display identifier in query-string. On the worker the websocket is piped to a statically linked instance of x11vnc running inside the task container. In the browser we then use noVNC to give the user an interactive remote display right in the browser.
As with the shell, there is also a few quirks to the interactive display. Some graphical artifacts and other “interesting” issues. When streaming a TCP connection over a websocket we might not be handling buffering all too well. Which I suspect introduces additional latency and possible bugs. I hope these things will get better in future iterations of the worker, which is currently undergoing an experimental rewrite from node to go.
Future Work
As mentioned in the “Quick Start” section, all of this is still a bit of a moving target. Access is to any loaner is effectively granted to anyone with commit level 1 or any employee. So your friends can technically hijack the interactive task you created. Obviously, we have to make that more fine-grained. At the moment, the “one-click loaner” button is also very specific to our Linux worker. As we add more platforms will have to extend support and find a way to abstract the platform dependent aspects. S it’s very likely that this will break on occasion.
We also recently introduced a hack defining the environment variable TASKCLUSTER_INTERACTIVE when a loaner task is created. A quick hack that we might refactor later, but for now it’s enabling Armen Zambrano to customize how the docker image used for tests runs in loaner-mode. In bug 1250904 there is on-going work to ensure that a loaner will setup the test environment, but not start running tests until a user connects and types the right command. I’m sure there are many other things we can do to make the task environment more useful in loaner-mode, but this is certainly a good start.
Anyways, much of this is still quick hacks, with rough edges that needs to be resolved. So don’t be surprised if it breaks while we improve stability and attempt to add support for multiple platforms. With a bit of time and resources I’m fairly confident that the “one-click loaner” flow could become the preferred method for debugging issues specific to the test environment.
When we started building TaskCluster about a year and a half ago one of the primary goals was to provide a self-serve experience, so people could experiment and automate things without waiting for someone else to deploy new configuration. Greg Arndt (:garndt) recently wrote a blog post demystifying in-tree TaskCluster scheduling. The in-tree configuration allows developers to write new CI tasks to run on TaskCluster, and test these new tasks on try before landing them like any other patch.
This way of developing test and build tasks by adding in-tree configuration in a patch is very powerful, and it allows anyone with try access to experiment with configuration for much of our CI pipeline in a self-serve manner. However, not all tools are best triggered from a post-commit-hook, instead it might be preferable to have direct API access when:
Locating existing builds in our task index,
Debugging for intermittent issues by running a specific task repeatedly, and
Running tools for bisecting commits.
To facilitate tools like this TaskCluster offers a series of well-documented REST APIs that can be access with either permanent or temporary TaskCluster credentials. We also provide client libraries for Javascript (node/browser), Python, Go and Java. However, being that TaskCluster is a loosely coupled set of distributed components it is not always trivial to figure out how to piece together the different APIs and features. To make these things more approachable I’ve started a series of interactive tutorials:
All these tutorials are interactive, featuring a runtime that will transpile your code with babel.js before running it in the browser. The runtime environment also exposes the require function from a browserify bundle containing some of my favorite npm modules, making the example editors a great place to test code snippets using taskcluster or related services.
As part of my goals this quarter I’ve been experimenting with running Talos in the cloud (Linux only). There are many valid reasons why we’re not already doing this. Conventional wisdom dictates that visualized resources running on hardware shared between multiple users is unlikely to have consistent performance profile, hence, regressions detection becomes unreliable.
Another reason for not running performances tests in the cloud, is that a cloud server is very different from a consumer laptop, and changes in performance characteristic may not reflect the end-user experience.
But when all the reasons for not running performance testing in the cloud have been listed, and I’m sure my list above wasn’t exhaustive. There certainly is some benefits to using the cloud, on-demand scalability and cost immediately springs to mind. So investigating the possibility of running Talos in the cloud is interesting, if not thing more it could be used for fast smoke tests.
Comparing Consistency of Instance Types
First thing to evaluate is the consistency of results depending on instance-type, cloud provider and configuration. For the purpose of these experiments I have chosen instances and cloud providers:
Digital Ocean (1g-1cpu, 2g-2cpu, 4g-2cpu, 8g-4cpu)
For AWS I tested instances in both us-east-1 and us-west-1 to see if there was any difference of results. In each case I have been using two revisions c448634fb6c9 which doesn’t have any regressions and fe5c25b8b675 which has clear regressions in test suites cart and tart. In each case I also ran the tests with both xvfb and xorg configured with dummy video and input drivers.
To ease deployment and ensure that I was using the exact same binaries across all instances I packaged Talos as a docker image. This also ensured that I could reset the test environment after each Talos invocation. Talos was invoked to run as many of the test suites as I could get working, but for the purpose of this evaluation I’m only considering results from the following suites:
tp5o,
tart,
cart,
tsvgr_opacity,
tsvgx,
tscrollx,
tp5o_scroll, and
tresize
After running all these test suites for all the configurations of instance type, region and display server enumerated above, we have a lot of data-points on the form results(cfg, rev, case) = (r1, r2, ..., rn), where ri is the measurement from the i’th iteration of the Talos test case case.
To compare all this data with the aim of ranking configurations by the consistency of their results, compute rank(cfg, rev, case) as the number of configurations cfg' where rank(cfg', rev, case) < rank(cfg, rev, case). Informally, we sort configurations based lowest standard deviation for a given case and rev and the index of a configuration in that list is the rank rank(cfg, rev, case) of the configuration for the given case and rev.
We then finally list configurations by score(cfg), which we compute as the mean of all ranks for the given configuration. Formally we write:
score(cfg) = mean({rank(cfg, rev, case) | for all rev, case})
Credits for this methodology goes to Roberto Vitillo, who also suggested using trimmed mean, but as it turns out the ordering is pretty much the same.
When listing configurations by score as computed above we get the following ordered lists of configurations. Notice that the score is strictly relative and doesn’t really say much. The interesting aspect is the ordering.
Warning, the score and ordering has nothing to do with performance. This strictly considers consistency of performance from a Talos perspective. This is not a comparison of cloud performance!
You may notice that the list above also contains the configuration mozilla-inbound-non-pgo which has results from our existing infrastructure. It is interesting to see that instances with high CPU exhibits lower standard deviation. This could be because their average run-time is lower, so the standard deviation is also lower. It could also be because they consist of more high-end hardware, SSD disks, etc. Higher CPU instances could also be producing better results because they always have CPU time available.
However, it’s interesting that both Azure and Digital Ocean instances appears to produce much less consistent results. Even their high-performance instances. Surprisingly, the data from mozilla-inbound (our existing infrastructure) doesn’t appear to be very consistent. Granted that could just be a bad run, we would need to try more revisions to say anything conclusive about that.
Unsurprisingly, it doesn’t really seem to matter what AWS region we use, which is nice because it just makes our lives that much simpler. Nor does the choice between xorg or xvfb seem to have any effect.
Comparing Consistency Between Instances
Having identified the Amazon c4 and c3 instance-types, as the most consistent classes, we now proceed to investigate if results are consistent when they are computed using difference instances of the same type. It’s well known that EC2 has bad apples (individual machines that perform badly), but this is a natural thing in any large setting. What we are interested in here is what happens when we compare results different instances.
To do this we take the two revisions c448634fb6c9 which doesn’t have any regressions and fe5c25b8b675 which does have a regression in cart and tart. We run Talos tests for both revisions on 30 instances of the same type. For this test I’ve limited the instance-types under consideration to c4.large and c3.large.
After running the tests we now have results on the form results(cfg, inst, rev, suite, case) = (r1, r2, ... rn) where ri is the result from the i’th iteration of the given test case under the given test suite, revision, configuration and instance. In the previous section we didn’t care which suite the test case belonged to. We care about suite relationship here because we compute the geometric mean of the medians of all test cases per suite. Formally we write:
score(cfg, inst, rev, suite) = geometricMean({median(results(cfg, inst, rev, suite, case)) | for all case})
Credits to Joel Maher for helping figure out how the current infrastructure derives per suite performance score for a given revision.
We then plot the scores for all instances as two bar-chart series one for each revision. We get the following plots. I’ve only included 3 here for brevity. Each pair of bars is results from one instance on different revisions, the ordering here is not relevant.
From these two plots it’s easy to see that there is a there is a tart regression. Clearly we can also see that performance characteristics does vary between instances. Even in the case of tart it’s evident, but it’s still easy to see the regression.
Now when we consider the chart for tresize it’s very clear that performance is different between machines. And if a regression here was small, it would be hard to see. Most of the other charts are somewhat similar, I’ve posted a link to all of them below along with references to the very sketchy scripts and hacks I’ve employed to run these tests.
While it’s hard to conclude anything definitive without more data. It seems that the C4 and C3 instance-types offers fairly consistent result. I think the next step is to setup a subset of Talos tests running silently along side existing tests while comparing results to regressions observed elsewhere.
Hopefully it should be possible to use a small subset of Talos tests to detect some regressions early. Rather than having all Talos regressions detected 12 pushes later. Setting this up is not going to a Q2 goal for me, but I should be able to set it up on TaskCluster in no time. At this point I think it’s mostly a configuration issue, since I already have Talos running under docker.
The hard part is analyzing the resulting data and detect regressions based on it. I tried comparing results with approaches like students t-tests. But there is still noisy tests that have to be filtered out, although preliminary findings were promising. I suspect it might be easiest to employ some naive form of Machine learning, and hope that magically solves everything. But we might not have enough training data.
When I was working on the aggregation code for telemetry histograms as displayed on the telemetry dashboard, I also wrote a Javascript library (telemetry.js) to access the aggregated histograms presented in the dashboard. The idea was separate concerns and simplify access to the aggregated histogram data, but also to allow others to write custom dashboards presenting this data in different ways. Since then two custom dashboards have appeared:
Both of these dashboards runs a cronjob that downloads the aggregated histogram data using telemetry.js and then aggregates or analyses it in an interesting way before publishing the results on the custom dashboard. However, telemetry.js was written to be included from telemetry.mozilla.org/v1/telemetry.js, so that we could update the storage format, use a differnet data service, move to a bucket in another region, etc. I still want to maintain the ability to modify telemetry.js without breaking all the deployments, so I decided to write a node.js module called telemetry-js-node that loads telemetry.js from telemetry.mozilla.org/v1/telemetry.js. As evident from the example below, this module is straight forward to use, and exhibits full compatibility with telemetry.js for better and worse.
// Include telemetry.jsvar Telemetry =require('telemetry-js-node');// Initialize telemetry.js just the documentation says to
Telemetry.init(function(){// Get all versionsvar versions = Telemetry.versions();// Pick a versionvar version = versions[0];// Load measures for version
Telemetry.measures(version,function(measures){// Print measures available
console.log("Measures available for "+ version);// List measures
Object.keys(measures).forEach(function(measure){
console.log(measure);});});});
Whilst there certainly is some valid concerns (and risks) with loading Javascript code over http. This hack allows us to offer a stable API and minimize maintenance for people consuming the telemetry histogram aggregates. And as we’re reusing the existing code the extensive documentation for telemetry is still applicable. See the following links for further details.
Disclaimer: I know it’s not smart to load Javascript code into node.js over http. It’s mostly a security issue as you can’t use telemetry.js without internet access anyway. But considering that most people will run this as an isolated cron job (using docker, lxc, heroku or an isolated EC2 instance), this seems like an acceptable solution.
By the way, if you make a custom telemetry dashboard, whether it’s using telemetry.js in the browser or Node.js, please file a pull request against telemetry-dashboard on github to have a link for your dashboard included on telemetry.mozilla.org.